:::: MENU ::::
Showing posts with label admin. Show all posts

Thursday, 4 February 2016


Every now and then you open a file and a message comes up warning you about a file being inaccessible and whether or not you want to suppress this, at the same time this warning may give you the Don’t show again option:

Dismissed-message-solidworks

But now whenever you open an assembly and a part is missing there is no warning message to let you know, so how do we get this back?

To access your dismissed messages you will need to navigate to Tools> Options> System Options> Messages/Errors/Warnings. Once there you will have a couple of options however the area at the bottom of the window is of interest to us, this is where all the messages which have been dismissed using the “don’t show again “options will be.

Dismissed-message-solidworks-2

For instance in mine I know have the message for the unable to locate the file as I dismissed. When I now check the box next to this message it will be removed from the list, once I select OK at the bottom, and be brought back into force. So that the next time I open a file which is missing a component the warning dialog is once again clearly displayed.

Friday, 21 August 2015


Where do you go when you need a quick refresher on how to use that feature you haven’t used in a while? SOLIDWORKS Web Help? Where do you go when you want to get your feet wet with surfacing? MySolidWorks? Sometimes the hardest part of sharpening your skills is just knowing where to look for help.

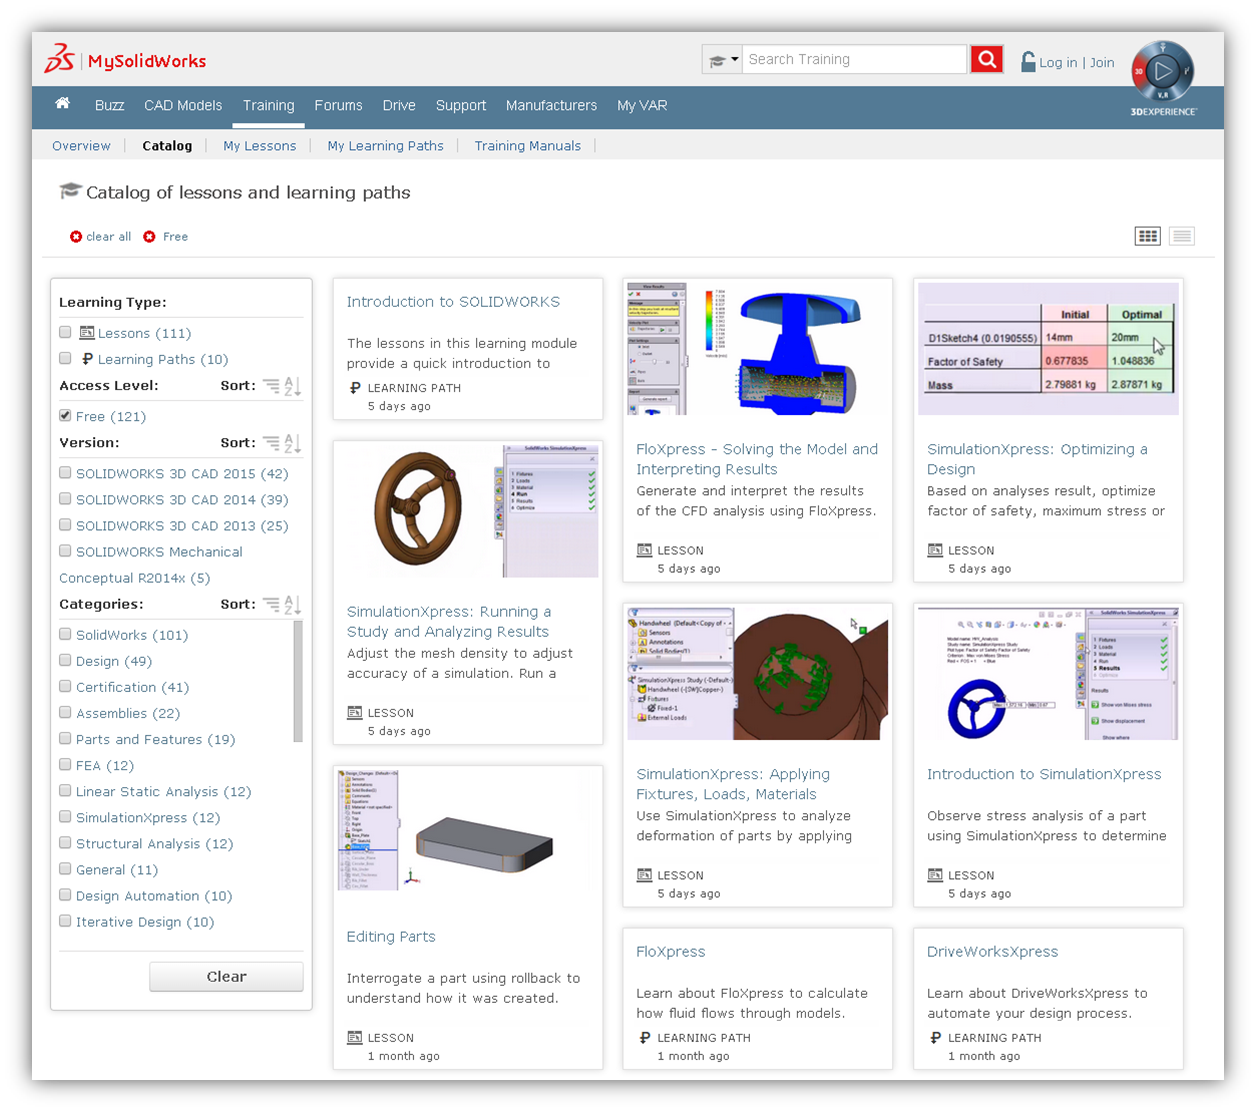
Let’s talk about MySolidWorks Training. Did you know that you have access to more than 100 training videos covering subjects like: Sketching, Simulation, and Routing? Head over to MySolidWorks and take a look at the catalog. You can sort by SOLIDWORKS Version and desired category. You can even choose to follow a Learning Path, which is a combination of Lessons that will help you meet an overall goal. Maybe you’re Interested in getting SOLIDWORKS Certified? Go ahead and add Certified SOLIDWORKS Exams to your Learning Paths, train when you want to, and track your progress!
Preview MySolidWorks Training
 

Wednesday, 27 May 2015


Life is full of shortcuts, but those typically don’t work out well for anyone.  Well that’s not the case with SOLIDWORKS shortcuts.  There are many places to use shortcuts in parts, sketches, assemblies, and drawings.

Think about how you create a model in SOLIDWORKS.  You choose a sketch plane, start a sketch, find a sketch entity to use, add some dimensions, then extrude that sketch into a feature. You do this over and over again until the model is created.  But during that process are you being as efficient as you can be?  Are you using any SOLIDWORKS shortcuts?  If not, you might consider it after seeing the results of the following examples.

When I’m teaching, I emphasis SOLIDWORKS shortcuts.  I have always said they will help get your design completed faster, but I never had any data to put behind it.  So, I figured that I would model the same part two different ways.  First I would model using my typical shortcuts and then with no shortcuts.  I timed myself modeling both ways to see which one was faster.  I also downloaded two tools to help track my mouse movements.  One shows where my mouse has been with a black line and the other tracks the distance in feet that my mouse has traveled.
Here’s the model that I chose.  It’s a part that has 3 extruded bosses, 3 cuts, 3 fillets, 19 sketch entities, and 19 dimensions.

Ratchet Model
In the first model I used my typical, everyday SOLIDWORKS shortcuts.  These shortcuts include some hotkeys (i.e. “L” for line & “D” for dimension), mouse gestures, and the shortcut tool bar (“S” key).

It took me 226 seconds to model it and my mouse traveled 28 feet.  These will be our base values.  Here is what the mouse path graphic looks like.
Ratchet using Shortcuts
You can see that my mouse really stayed in the middle of my screen right where my model is.  I didn’t need to move to the Command Manager for anything.

Now let’s look at the example where I didn’t use any SOLIDWORKS shortcuts. It took me 421 seconds to model it and my mouse moved 103 feet.  Here is the mouse path graphic.
Ratchet using No Shortcuts

I can say that I modeled this as fast as I think I can.  I had to really try to not use any shortcuts.  This was harder than I thought it would be.  As you can see, my mouse spent more time on the Property Manager and Command Manager than in the graphics area.
Let’s take a look at the numbers.  I can see that I had a savings of 46% in time and 73% in mouse movement by using SOLIDWORKS shortcuts.
Time and Travel Savings

I don’t know of a any reason not to use SOLIDWORKS shortcuts.  If you haven’t taken the time to setup any keyboard shortcuts, gestures, or the “S” key toolbar, the above examples should cause you to strongly consider it.  You should customize your environment to match what you do.  If you do a lot of sheet metal, then add the sheet metal tools to the shortcuts.  Identify the features you use the most and make them easily available.
I thought you might be wondering what my “S” key has on it.  Here it is for sketches and parts.
Sketch-Shortcuts
Part-Shortcuts\


Also, here are two PDFs that show you my settings for shortcut keys and gestures.
SOLIDWORKS-Shortcut-keys-document
SOLIDWORKS-mouse-gestures-document
Again, be sure to customize your shortcuts to match your needs and begin improving your efficiency today.

Friday, 1 May 2015


Most of us don’t use SOLIDWORKS with any sort of fancy, new-fangled, professional 3D mouse. Instead, we make due with a standard, two-button mouse that probably comes with a scroll wheel and maybe a couple of other buttons. Does this make us any less important? Of course not! But does it put us at a disadvantage in terms of productivity? Perhaps so…
 
However, this doesn’t mean we can’t try to make up some ground. You are no doubt familiar with using at least some of the many hotkeys in SOLIDWORKS and being able to tailor them to fit your needs. But what about leveraging that simple point-and-click device that your primary hand rarely comes off of? Traditionally, SOLIDWORKS commands are executed by positioning the mouse over whatever command you so choose. But what if you could make those commands come to your mouse!?
mouse sping est 2
This is possible with the use of Mouse Gestures. This was a tool added in back in SOLIDWORKS 2010 to help with selecting commands faster, and it’s a tool that, with practice, can really become second nature. Mouse Gestures are used by clicking and holding the right-mouse-button, and then dragging the cursor in any direction, such as dragging “due north” to generate a Top view in the example below.
rmb drag 2
A command is chosen based on which direction you drag, with the available commands varying based on the context you are in (part, assembly, etc) and by default being as follows.
ALL def gestures
Making these gestures a routine part of your workflows can really help with your efficiency, and you can take it a step further by customizing the gestures. This customization can be as simple as assigning different tools to particular gestures, or you can get fancy by assigning any macros you might have to them as well. Customizations will all be done in the Mouse Gestures tab of the Customize dialog box below. One quick change that I’ve set up is going up to 8 available gestures, doubling the gestures available by adding in some intermediate directions to our compass rose of Mouse Gestures.
customize menu
And that’s about it! Mouse Gestures are a powerful time-saver SOLIDWORKS provides us that, with practice, can really help speed up your modeling. Whether or not you decide to customize, get out and use them often to start saving yourself some clicks!

Wednesday, 22 October 2014


MySolidWorks Training – NEW 120 online training modules added tailored to meet SOLIDWORKS users needs including SOLIDWORKS Certification prep courses. New training content includes SOLIDWORKS Essentials, Advanced Part Modeling, Sheet Metal Design, Assembly Modeling, and more.
MySolidWorks_OnlineTraining_Oct2014
MySolidWorks Drive – Connects cloud-based file storage services, such as Dropbox and Google Drive with MySolidWorks. MySolidWorks Drive enables SOLIDWORKS users to view their designs online with the eDrawings online viewer and easily share large designs files with manufacturers, colleagues and vendors from anywhere.
MySolidWorks_Drive_Oct2014
My VAR – Allows resellers to promote information and technical content to their users. Resellers can plug in their content feed for blogs, videos, news and display a schedule of events such as webinars and seminars.
MySolidWorks_MyVAR_Oct2014
MySolidWorks Manufacturing Network – Designed to connect SOLIDWORKS users and reliable manufacturers with 3D Printing, Sheet metal, CNC Machining and Injection Molding capabilities. Starting today – Manufacturers can register to get listed on the Manufacturing Network and SOLIDWORKS users can recommend manufacturers to be added. Coming  soon – SOLIDWORKS users will be able to find and connect with these manufacturers to get physical parts made fast while manufacturers will be able to reach SOLIDWORKS users more directly to promote their services and respond to RFQ’s.
MySolidWorks_MfgNetwork_Oct2014
New packaging
MySolidWorks now consists of three levels:
MySolidWorks
  • MySolidWorks Search – Get the best answers to questions from across all SOLIDWORKS community resources in one location
  • 10+ hours of online training content
  • Free access for anyone
MySolidWorks Standard
  • MySolidWorks Search – Get the best answers to questions from across all SOLIDWORKS community resources, Knowledge Base and advanced forum sections in one location
  • 30+ hours of online training content
  • MySolidWorks Drive
  • Access to MySolidWorks Manufacturing Network
  • Access to My VAR
  • Included with SOLIDWORKS subscription
MySolidWorks Professional
  • MySolidWorks Search – Get the best answers to questions from across all SOLIDWORKS community resources, Knowledge Base and advanced forum sections in one location
  • 100+ hours of online training content
  • Online SOLIDWORKS Certification prep-courses
  • MySolidWorks Drive
  • Access to MySolidWorks Manufacturing Network
  • Access to My VAR
  • Additional cost for SOLIDWORKS subscription services customers*

Tuesday, 8 July 2014


If you have problems with SolidWorks like not loading, missing toolbars, poor performance or other bizarre issues try this process. Ensure you follow this instructions exactly as you will be modifying register entries which can cause you computer to go boom!  

  1. Close all instances of SolidWorks.

  1. Save copy of you SolidWorks settings.


  1. Click 'start', search 'regedit', open it.


  1. Navigate to 'HKEY_CURRENT_USER' then 'Software'


  1. Locate 'Solidworks' folder and rename to 'Solidworks_1'

  1. Launch SolidWorks - will open with all settings as default.

How to undo this operation

If the problem you were experiencing is gone, great!  If not, and you want to undo what you just did, no problem, that’s why we only renamed the SolidWorks entry and didn’t delete it. Simply go back into Registry Editor and rename the new SolidWorks entry (again best not to delete it until you are sure everything is back exactly as before) then name the old one back to SolidWorks. If the issue is fixed you are now left with essentially a fresh copy of SolidWorks, meaning any customization you have performed will be lost.

Restoring SolidWorks Custom Settings

However, if you have made a copy of your custom SolidWorks settings then you will be able to re-import these after the reset has been performed. DO NOT, however, perform the Copy Settings operation when you are already experiencing issues, this will just copy the old problems back into the registry.  Make a back-up of your settings when everything is working correctly and save the resulting .SLDREG file in a safe location. This way performing a reset of the SolidWorks registry in the future will be an easy and quick procedure with no time consuming side effects.


Monday, 7 July 2014

After the what's new meeting today we will be installing SW2014.


Locate here:

J:\Design IT\Solidworks\Documentation

Follow doc 1 to 4.


Can you let me know if there is any issues with documents so I can amend them for future use. Also if you have any install issues ask me.

Thanks Mike


Monday, 9 June 2014


Some time ago Euan W discovered a problem with SW2013. When instant 3D is on normal distance does not show up in the status bar. This problem was submitted to solidworks and will be fixed in 2015 release.

 
This shows that Solidworks does listen to customer feedback and well worth submitting errors, faults, improvements, ideas etc. These can be submitted though 'my solidworks' http://my.solidworks.com/  or intercad via phone or email.   


SR# (Service Request): 1-4112519221

VAR SR#: 97145

SPR#: 689711

Description: Normal distance not shown in status bar with option Instant3D selected.

Status: Implemented.

Version: 2015  b1

Friday, 9 May 2014


Released today is MySolidWorks Learning, a new service that provides SOLIDWORKS users access to online learning content. Now you can learn SOLIDWORKS on your own schedule, at your own pace, from the convenience of your desktop or mobile device. It’s easy to get started. Go to http://my.solidworks.com/mylearning, browse or search for learning content and take a lesson.
MySolidWorks LearningMySolidWorks Learning

Designed to complement Instructor Led Training

The initial lessons are designed to complement our SOLIDWORKS instructor-led training classes and there is 30+ hours of online learning content available today, additional content will be added in future updates.
NOTE: Some of the content requires an active SOLIDWORKS subscription, so make sure to register your SOLIDWORKS product serial number with your SOLIDWORKS online account to access all the online lessons.

Current MySolidWorks Features

MySolidWorks is not another SOLIDWORKS community – it is a “gateway” to information, content and resources related to SOLIDWORKS and the online community. Here is a list of the current features available. If you already have a SOLIDWORKS customer portal or forum account, you can use that to log into My.SolidWorks.com.

What you can do at MySolidWorks
 
NEW! SOLIDWORKS online learning content. Learn SOLIDWORKS on your own schedule, at your own pace, from the convenience of your desktop or mobile device.


Search and get answers to your questions about SOLIDWORKS from across the SOLIDWORKS community and support resources.


Access and search the Knowledge Base Solutions, SPRs (bugs), online help, and more.


Browse an abundance of available resources and stay up to date on SOLIDWORKS.


Access the SOLIDWORKS Support Home Page and get downloads, system requirements, and more.


Access online training manuals – for customers who attend a Javelin training session.


Share information, tips, answers and insights with colleagues and your team and add more value.


Bookmark useful items, and quickly and easily get back to them at any time.


Contribute and help others get more from SOLIDWORKS.


*Partial access.  Subscription Service required for full access.

You can also access:

  • DraftSight product videos and getting started guides
  • Search enhancements
  • Download SOLIDWORKS online training manuals (for customers who attended a training class).
So go visit MySolidWorks and try the new online learning. DS SOLIDWORKS have launched this as a new service, so please provide your feedback here: http://my.solidworks.com/feedback.

Tuesday, 8 April 2014


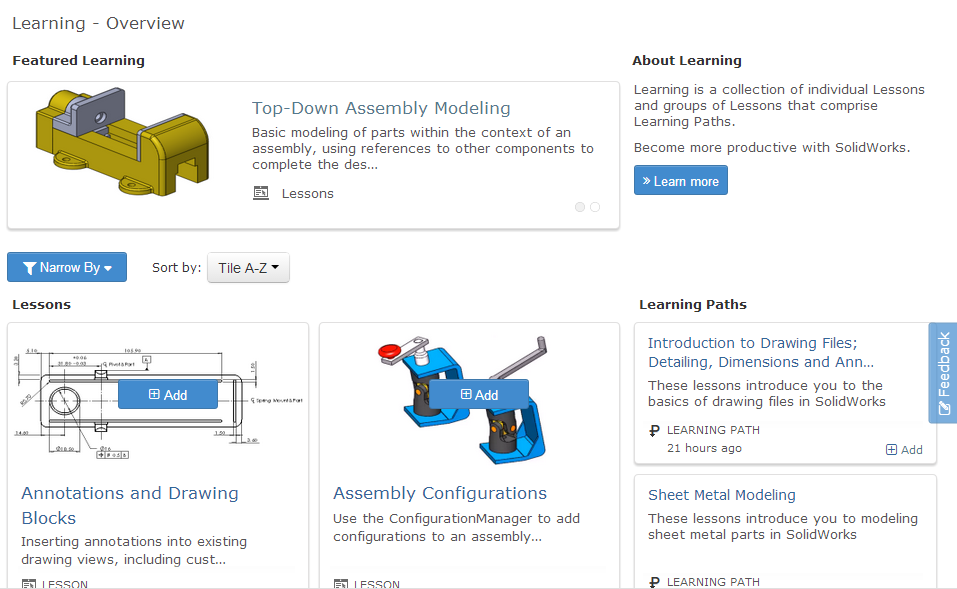
We are excited to introduce MySolidWorks Learning, a new service that provides you, our users, with access to online learning content. Now you can learn SOLIDWORKS on your own schedule, at your own pace, from the convenience of your desktop or mobile device.
learning_overview
The initial lessons are designed to complement SOLIDWORKS instructor-led training classes and with 30+ hours of online learning content available today we will continue to add additional content in future updates.
It’s easy to get started. Go to http://my.solidworks.com/mylearning, browse or search for learning content and take a lesson.
Some of the content requires an active SOLIDWORKS subscription, so please make sure to register your SOLIDWORKS product serial number with your SOLIDWORKS online account.

Thursday, 6 February 2014


This is a fix to the problem of the preview not remembering its location after closing and opening explorer.  


1. Open explorer and go to this location:


%userprofile%C\AppData\Roaming\Microsoft\Internet Explorer\Quick Launch\User Pinned\TaskBar

 Example for me.


2. Right click on 'window explorer' go to properties and paste below into target field


%windir%\explorer.exe /e /root,::{20D04FE0-3AEA-1069-A2D8-08002B30309D}


3. Click ok.


Now you can resize the preview panel and it will remember is location after closing explorer and resetting computer.


Note: it does not seem to work if you open more than one explorer window.


Posted by: Mike

Thursday, 30 January 2014


Have you been in this situation; got a large model open and need to check something on another model.

 
How you can open this model in the same SW season which is ok but slow and easy to be confused what model is what. Also this will slow down the network and your computer sometimes leading to crashers. Another tip is to open in lightweight or large assembly mode which is a bit quicker but still similar issues.
 
 
Another way is to open in another SW season. This works will with dual monitors as you can quickly move from one model to the other. But again very slow and poor performance.
 

The 3rd option is to open the reference model in edrawings. The key here is speed - a large cabinet will open in a couple of seconds. Also this does not effect computer and network as much. Another plus is it is impossible to change the model by mistake. In edrawings you can select parts for files names, move, hide, rotate, section, and measure. So for referencing or showing someone models quickly it works well.
 

The install file is located:


If anyone needs help I am happy to help, Mike.


Wednesday, 22 January 2014


Default Setting: File > Save As > JPG > Options…
The following demonstrates the property that the result is “dependent on the screen resolution.”
This image shows the state of SolidWorks as related to my PC screen area when Save As/JPG was done:

The resultant JPG with default settings and SolidWorks set as above is:

Shown zoomed in on title block 6 times:

The following is the same defaults, just with SolidWorks set to Full Screen and drawing area maximized vs. the display:
SolidWorks vs. Display – (Notice you can see my Windows toolbar at the bottom of the image)
The resultant JPG:
Showing zoomed in on the title block 6 times:
Notice the image is larger and the fine print is now legible.

The rest of the following images are taken with my display set partial screen as in the second image in this post.
I modified the default “JPG Compression” only and set it to High (low quality). See slider in below image.
The result of just modifying the compression to HIGH is:

Alternately to the default output, you can switch over to DPI or “Print Capture” mode. This allows you to specify the Dots Per Inch output you want vs. pulling it automatically from the Display Resolution. The following image shows “Print Capture” enabled and the resolution set to “1200 DPI.”
Note: Setting higher resolutions can increase the file size and the time to generate the JPG/TIFF substantially.


As a comparison, here is the Full Screen version of the title block (zoomed up 6x) using the Default settings.
Here is the resultant title block at 1200 DPI, actually scaled DOWN to fit.


It is very easy to see the clarity difference. You need to consider the file size and generation time if you are going to batch print a lot of drawings. You can find a happy medium if you play with the DPI setting vs. the end quality you need. The two drawings that generated the title blocks above had the following end file size:
I hope you find this information useful. Happy Modeling!