:::: MENU ::::
Showing posts with label drawings. Show all posts

Friday, 4 September 2015


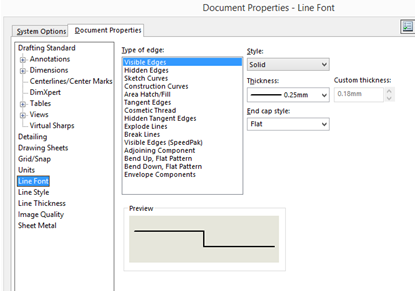
Using the Snap and Align tools to center notes in a SOLIDWORKS Drawing Title Block has always been a little bit cumbersome; but there is a tool available to center a note on a rectangle. Here is how it works:
  1. Right-click on a SOLIDWORKS Drawing Sheet and select Edit Sheet Format from the shortcut menu.
  2. Then pick the note that you want to align in the title box; in this example I have a custom property note linked to a part material which is displayed as ‘AISI 304’, as shown in the figure below. As you can see the note is not centered in the material box of the title block as required.
Note requiring centering
Figure 1: Note requiring centering
  1. To align it to the center of the box right-click on the note and select Snap to Rectangle Center from the shortcut menu.
Note shortcut menu
Figure 2: Note shortcut menu
  1. If you notice in the bottom-left of the SOLIDWORKS Window the prompt states ‘Select 4 sides of rectangle’, now this doesn’t mean you have to select a sketch rectangle (although you could select a rectangle), it can be four lines that form a rectangle. So I’ll pick the four lines of the title block as shown in figure 3 below, the order of selection does not matter.
Selection for rectangle area
Figure 3: Note rectangle area selection
  1. The text will now relocate to the center of the box as shown below in figure 4.
Note centered to selected area
Figure 4: Note centered to selected area

Tuesday, 1 September 2015


Hold down your right mouse button and slowly move your mouse pointer. The ‘wheel’ that appears on your screen is the in-context mouse gesture shortcut toolbar, and each of the icons is a shortcut.
Just swipe the mouse pointer over an icon and you will instantly access that command. The gesture wheel is fully customisable, so you can have up to 8 different shortcuts, and its in-context, so you see different shortcuts if you are in sketch, part, drawings or assembly mode.
Techie_1

Techie_2
 To customise the wheel, right click on the command manager toolbar and select Customize:
Techie_3   Techie_4
 Select the Mouse Gestures tab, here you can select 4 or 8 wheel gestures.
Techie_5
Tip: A slow double click on the column title will sort already set shortcuts.
Techie_6To set a shortcut either scroll down the list or use search tool to find the command you want, then click in the relevant column and cell to set its wheel position:

Techie_7
After a bit of practice and as you start to remember the wheel positions you will become faster and more productive, you can also print the gestures list out and keep a copy by your machine (ensure that “Show only commands with mouse gestures assigned” is checked before printing):
Techie_8


Thursday, 6 August 2015


In a SOLIDWORKS drawing that references multiple models, annotations sometimes get linked to the wrong part or assembly.  In the example shown below, the title block is linked to the top-level assembly that is displayed in the upper left corner as a reference, and not the shaft assembly that is shown in the foreground with a BOM and balloons.
Annotations linked to a wrong model
This mix-up can be easily corrected.  When annotations are linked to custom properties we can select the ‘model in view specified in sheet properties.’ option as shown below:
Model in view specified in sheet properties
In a drawing that references a single part or assembly, this works without any issues.

For Drawings that reference more than one Model

For a drawing that reference more than one model, annotations get linked to the incorrect model when the wrong view is specified in sheet properties.  Sheet settings are accessed by right-clicking on a blank space in the drawing and selecting ‘Properties.’  The drop down menu lists all views in the drawing.
Use custom properties value from the model shown in
Selecting the drawing view of the correct model updates the annotation links.  In the example shown, the title block no longer refers to the top-level assembly, but the shaft subassembly.
Annotations linked to the correct model

Video Demonstration

Watch the video demonstration to learn how to update drawing views:

Wednesday, 29 July 2015


With all of the information you need to show on your drawing sheets they get rather full and complicated.  You might want separate sheets with the Section and Detail views.  If you try creating a new sheet to add these views, you will notice that they are greyed out.  Section and Detail views require a parent view to reference.  Since this new sheet has no views, you cannot create these child views.
Section and Detail Views greyed out
One method is just to add a standard view, but place it off the page so it doesn’t get printed.  But this isn’t the best method as the View Label does not reference any view in the drawing sheets when printed.

Instead you can create a Section or Detail view on the original sheet, then drag and drop the view in the FeatureManager Design Tree onto another existing sheet.  Be sure the sheet that contains the Section or Detail views is active before dragging.
Drag Section View onto Existing Sheet in the Design Tree
Drag Detail View onto Existing Sheet in the Design Tree
Now you’ll have just the Section and Detail View on the second sheet that references the parent view on the first sheet.  If you have many sheets with various views, you can always find Parent View of the Section/Detail View by right-clicking on this view and select “Jump to Parent View” which will switch to the correct sheet and select the parent view.
Jump to Parent View Command
Here is a video demonstrating this workflow:


Monday, 29 June 2015


Often on support customers come to us with drawings that have incorrect dimension values on drawing views.

More often than not the issue is related to a setting in drawing view property manager. The setting is located toward the bottom of the view property manager called “Dimension Type”.


SolidWorks® Help Files definition:
Dimensions in drawings are either:
  • True Accurate model values.
  • Projected 2D dimensions.
The dimension type is set when you insert a drawing view. You can view and change the dimension type in drawing view Property Managers.

The rules for dimension type are SOLIDWORKS specifies Projected type dimensions for standard and custom orthogonal views and True type dimensions for isometric, dimetric, and trimetric views.
If you create a projected or auxiliary view from another view, the new view uses Projected type dimensions, even if the original view used True type dimensions.

So if you’re adding dimensions to a view and are finding them to be incorrect?
This can occur if the drawing views are using “True” dimensions instead of “Projected” dimensions.  In general, conventional drawing views should use projected dimensions; true dimensions should be used for 3D views such as isometric and diametric.

Note: if you change this dimension type setting you will lose all dimensions that you’ve already placed in the view.

Thursday, 11 June 2015


When a SOLIDWORKS drawing sheet becomes crowded and difficult to read, it may help to know that it is possible to move a drawing view or a BOM to a different sheet.  All dimensions and annotations move with the view.

Applying SOLIDWORKS Drawing Move View

In the design tree, activate the sheet that includes the drawing view that is being moved.  Click on the view with the left-mouse button and keep the button pressed.  Drag the view and hover over the name of the sheet to which it is being moved.  When the icon that looks like a yellow bent arrow pointing to the left appears, release the left mouse button to drop the view on the sheet.

SOLIDWORKS Drawing Move View
Drag and drop a drawing view to a different sheet

The same method works for moving BOMs from one sheet to another.  The sheet that includes BOM must be active before the move.

Drag and drop a BOM to a different sheet

Friday, 5 June 2015


The image quality setting in SolidWorks can be your friend or… your worst enemy:

With SolidWorks® drawings sometimes you can get issues like;

Edges on models show in some views but do not in other views
Dimensions not attaching to edges correctly
Incomplete printing
Parts missing
Incomplete section views
Export to DWG/DXF and PDF issues
File size issues
Zoom/pan performance
and many others…

The “Image Quality” setting in SolidWorks® found under Tools>Options>Document Properties>Image Quality
When the 2 image quality sliders are too low, you can have issues as mentioned above, also if the sliders are too high you can have issues with performance, as the file size will be much larger. If your drawing is a large drawing file moving these sliders down can help with performance. But when it comes time to print or export your drawing to a PDF say, jump in and move these sliders up to say %80. Going too high can lead to an unreasonable drawing file size.

Wednesday, 27 May 2015


Life is full of shortcuts, but those typically don’t work out well for anyone.  Well that’s not the case with SOLIDWORKS shortcuts.  There are many places to use shortcuts in parts, sketches, assemblies, and drawings.

Think about how you create a model in SOLIDWORKS.  You choose a sketch plane, start a sketch, find a sketch entity to use, add some dimensions, then extrude that sketch into a feature. You do this over and over again until the model is created.  But during that process are you being as efficient as you can be?  Are you using any SOLIDWORKS shortcuts?  If not, you might consider it after seeing the results of the following examples.

When I’m teaching, I emphasis SOLIDWORKS shortcuts.  I have always said they will help get your design completed faster, but I never had any data to put behind it.  So, I figured that I would model the same part two different ways.  First I would model using my typical shortcuts and then with no shortcuts.  I timed myself modeling both ways to see which one was faster.  I also downloaded two tools to help track my mouse movements.  One shows where my mouse has been with a black line and the other tracks the distance in feet that my mouse has traveled.
Here’s the model that I chose.  It’s a part that has 3 extruded bosses, 3 cuts, 3 fillets, 19 sketch entities, and 19 dimensions.

Ratchet Model
In the first model I used my typical, everyday SOLIDWORKS shortcuts.  These shortcuts include some hotkeys (i.e. “L” for line & “D” for dimension), mouse gestures, and the shortcut tool bar (“S” key).

It took me 226 seconds to model it and my mouse traveled 28 feet.  These will be our base values.  Here is what the mouse path graphic looks like.
Ratchet using Shortcuts
You can see that my mouse really stayed in the middle of my screen right where my model is.  I didn’t need to move to the Command Manager for anything.

Now let’s look at the example where I didn’t use any SOLIDWORKS shortcuts. It took me 421 seconds to model it and my mouse moved 103 feet.  Here is the mouse path graphic.
Ratchet using No Shortcuts

I can say that I modeled this as fast as I think I can.  I had to really try to not use any shortcuts.  This was harder than I thought it would be.  As you can see, my mouse spent more time on the Property Manager and Command Manager than in the graphics area.
Let’s take a look at the numbers.  I can see that I had a savings of 46% in time and 73% in mouse movement by using SOLIDWORKS shortcuts.
Time and Travel Savings

I don’t know of a any reason not to use SOLIDWORKS shortcuts.  If you haven’t taken the time to setup any keyboard shortcuts, gestures, or the “S” key toolbar, the above examples should cause you to strongly consider it.  You should customize your environment to match what you do.  If you do a lot of sheet metal, then add the sheet metal tools to the shortcuts.  Identify the features you use the most and make them easily available.
I thought you might be wondering what my “S” key has on it.  Here it is for sketches and parts.
Sketch-Shortcuts
Part-Shortcuts\


Also, here are two PDFs that show you my settings for shortcut keys and gestures.
SOLIDWORKS-Shortcut-keys-document
SOLIDWORKS-mouse-gestures-document
Again, be sure to customize your shortcuts to match your needs and begin improving your efficiency today.

Wednesday, 20 May 2015


SolidWorks has multiple options for replacing reference files.  References can be replaced in SolidWorks Explorer without having to open the file.  While a SolidWorks file is being open, the References button in the ‘Open’ dialog provides access to a list of reference files with the option to replace them.  After an assembly is open, right-clicking on a component brings up the option to replace that component.  In a drawing file, right-clicking on a drawing view gives us the option to replace the model used in the view.

Replace model in a drawing view

It may not be obvious until the command is activated that we can also replace assembly with a part or part with assembly in a drawing view.

Replace assembly with a part or part with assembly in a drawing view

This option can be useful when design changes result in switching from assembly format to a part or the other way round.  Replacing assembly with a part or part with assembly in a drawing view leaves any dimensions in the drawing view dangling.  That means that some rework is usually required; however, the option to replace model in the view, with parts and assemblies being interchangeable, can save the time updating drawing files.

Thursday, 14 May 2015


SOLIDWORKS installs with a large library of appearance files that you can apply to your models, but you can also create a SOLIDWORKS Custom appearance file from any image you wish.

Create a Custom Appearance File

To create a new custom appearance file, you need to start by editing an existing appearance with a texture.  Make sure you are editing the appearance using the “Advanced” option, this way you can change the path for the texture file.
Edit Existing Appearance
 
Go to the “Image” section of the dialogue and click browse to select the image file that you wish to use as the basis for the new appearance.  Select the image file and click “Open”.
Once the image file is applied to the appearance you can make any additional changes you wish, such as adjusting the color tint or the scale of the image mapping.
Edit Texture
Edit Texture
 
To save these setting to a new appearance file, go to the “Appearance” section and click “Save Appearance …”.  A new custom .p2m appearance file will be created with the setting you have specified.  This appearance can then be applied to other SolidWorks models.
Save new P2M file
Save new P2M file

Add to the Appearance Library

Once you have saved the appearance file to a folder location you will be given the option of adding that folder location to the appearance library list.
Add Folder Location
Add Folder Location
New Custom Folder
New Custom Folder Added


Tuesday, 12 May 2015


There are some occasions where you may need a single Custom Property value to have multiple lines. The Custom Property dialog only has one line and hitting enter will just evaluate the value for a single line.  However you can have multiple lines by copying the values in from Notepad.
SOLIDWORKS Multi-Line Custom Property
Copy Multi-line Property from Notepad
 
The Evaluated Value column in the Custom Properties dialog will only display the first line, however if you link a Note to this property, it will display all the lines.
Link to Property
Link to Property
 
Here is a video demonstrating the workflow:


Thursday, 7 May 2015


Do you recall a time when an Application Engineer first came to your business to demo SOLIDWORKS? You might recall seeing him or her click all over the screen, mashing buttons, moving parts and bringing up features with the slightest movement of their wrist.

It may seem like they were working magic but I’m here to clue you in on a secret. They didn’t have a special macro running in the background nor did they spend countless hours customizing the settings to tweak the shortcuts. Mostly, they used the default settings in SOLIDWORKS to make their workflow faster and more convenient. Just like any program based in the Windows operating system, there are quite a few commands that are common to any program (everyone knows about Ctrl-X, Ctrl-C, and Ctrl-V). But all programs have their own little quirks, and SOLIDWORKS is no exception.
Shortcuts

Monday, 4 May 2015


We have found that some customers have been a little confused by line thicknesses. Specifically the line thickness displayed in SOLIDWORKS versus the line thickness that is printed. Below is a guide that explains the process. 

There are 2 areas where line weights are defined:
Tools->options document properties->line font
Tools->options document properties->line thickness (This drives the options available in the line font menu)
Firstly we will look at the Line Font Menu
Line thicknesses
In this menu you can specify line thicknesses for the drawing items; visible edges, hidden edges, etc.
To do this, select the type of edge, then the line thickness from the drop down menu.
2
Highlighted orange are visible edges i.e model edges.
Highlighted red is the line thickness displayed in SOLIDWORKS
Highlighted yellow is the print size (the size cannot be adjusted from this area).
Therefore if we print a view as per the above settings we get the following:
3
Let’s change the settings:
4
Above you can see I have changed the second line weight in the drop down from 0.25 to 2mm (I will address how this is changed shortly).
Therefore if we print a view as per the above settings we get the following:
5
As I already had the second option selected, there is no change in the SOLIDWORKS display, but the print preview lines are much thicker.
How do we change the thicknesses in the drop down menu?
Tools->options document properties->line thickness
6
Highlighted Red are the line thicknesses displayed in SOLIDWORKS – These cannot be changed.
Highlighted Yellow is the thickness they will print at.
How Can I get my SOLIDWORKS display and print display line thicknesses to be the same?
7
If you set a custom size for a line in the line font menu, the SOLIDWORKS display & print display will show the lines as the same thickness.

Friday, 1 May 2015


Most of us don’t use SOLIDWORKS with any sort of fancy, new-fangled, professional 3D mouse. Instead, we make due with a standard, two-button mouse that probably comes with a scroll wheel and maybe a couple of other buttons. Does this make us any less important? Of course not! But does it put us at a disadvantage in terms of productivity? Perhaps so…
 
However, this doesn’t mean we can’t try to make up some ground. You are no doubt familiar with using at least some of the many hotkeys in SOLIDWORKS and being able to tailor them to fit your needs. But what about leveraging that simple point-and-click device that your primary hand rarely comes off of? Traditionally, SOLIDWORKS commands are executed by positioning the mouse over whatever command you so choose. But what if you could make those commands come to your mouse!?
mouse sping est 2
This is possible with the use of Mouse Gestures. This was a tool added in back in SOLIDWORKS 2010 to help with selecting commands faster, and it’s a tool that, with practice, can really become second nature. Mouse Gestures are used by clicking and holding the right-mouse-button, and then dragging the cursor in any direction, such as dragging “due north” to generate a Top view in the example below.
rmb drag 2
A command is chosen based on which direction you drag, with the available commands varying based on the context you are in (part, assembly, etc) and by default being as follows.
ALL def gestures
Making these gestures a routine part of your workflows can really help with your efficiency, and you can take it a step further by customizing the gestures. This customization can be as simple as assigning different tools to particular gestures, or you can get fancy by assigning any macros you might have to them as well. Customizations will all be done in the Mouse Gestures tab of the Customize dialog box below. One quick change that I’ve set up is going up to 8 available gestures, doubling the gestures available by adding in some intermediate directions to our compass rose of Mouse Gestures.
customize menu
And that’s about it! Mouse Gestures are a powerful time-saver SOLIDWORKS provides us that, with practice, can really help speed up your modeling. Whether or not you decide to customize, get out and use them often to start saving yourself some clicks!