We have found that some customers have been a little confused by line thicknesses. Specifically the line thickness displayed in SOLIDWORKS versus the line thickness that is printed. Below is a guide that explains the process.
There are 2 areas where line weights are defined:
Tools->options document properties->line font
Tools->options document properties->line thickness (This drives the options available in the line font menu)
Firstly we will look at the Line Font Menu
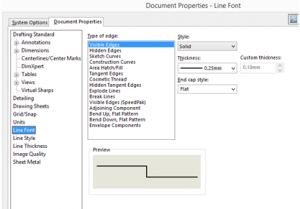
In this menu you can specify line thicknesses for the drawing items; visible edges, hidden edges, etc.
To do this, select the type of edge, then the line thickness from the drop down menu.
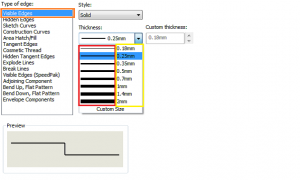
Highlighted orange are visible edges i.e model edges.
Highlighted red is the line thickness displayed in SOLIDWORKS
Highlighted yellow is the print size (the size cannot be adjusted from this area).
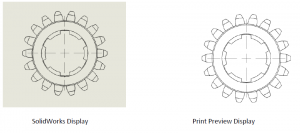
Therefore if we print a view as per the above settings we get the following:
Let’s change the settings:
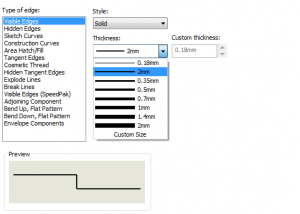
Above you can see I have changed the second line weight in the drop down from 0.25 to 2mm (I will address how this is changed shortly).
Therefore if we print a view as per the above settings we get the following:
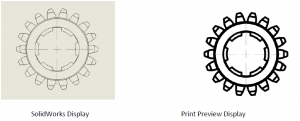
As I already had the second option selected, there is no change in the SOLIDWORKS display, but the print preview lines are much thicker.
How do we change the thicknesses in the drop down menu?
Tools->options document properties->line thickness
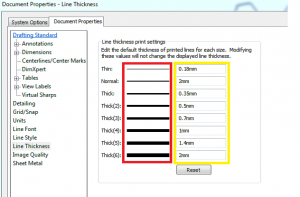
Highlighted Red are the line thicknesses displayed in SOLIDWORKS – These cannot be changed.
Highlighted Yellow is the thickness they will print at.
How Can I get my SOLIDWORKS display and print display line thicknesses to be the same?
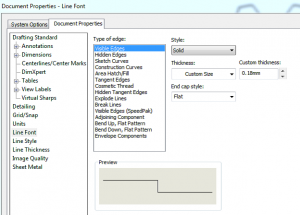
If you set a custom size for a line in the line font menu, the SOLIDWORKS display & print display will show the lines as the same thickness.
There are 2 areas where line weights are defined:
Tools->options document properties->line font
Tools->options document properties->line thickness (This drives the options available in the line font menu)
Firstly we will look at the Line Font Menu

In this menu you can specify line thicknesses for the drawing items; visible edges, hidden edges, etc.
To do this, select the type of edge, then the line thickness from the drop down menu.

Highlighted orange are visible edges i.e model edges.
Highlighted red is the line thickness displayed in SOLIDWORKS
Highlighted yellow is the print size (the size cannot be adjusted from this area).
Therefore if we print a view as per the above settings we get the following:

Let’s change the settings:

Above you can see I have changed the second line weight in the drop down from 0.25 to 2mm (I will address how this is changed shortly).
Therefore if we print a view as per the above settings we get the following:

As I already had the second option selected, there is no change in the SOLIDWORKS display, but the print preview lines are much thicker.
How do we change the thicknesses in the drop down menu?
Tools->options document properties->line thickness

Highlighted Red are the line thicknesses displayed in SOLIDWORKS – These cannot be changed.
Highlighted Yellow is the thickness they will print at.
How Can I get my SOLIDWORKS display and print display line thicknesses to be the same?

If you set a custom size for a line in the line font menu, the SOLIDWORKS display & print display will show the lines as the same thickness.

0 comments:
Post a Comment
Note: only a member of this blog may post a comment.