:::: MENU ::::
Showing posts with label software. Show all posts

Tuesday, 8 December 2015


I thought I’d share with you a game changer. Something that once you see it, it will make you look at SOLIDWORKS in a completely different light and in an even more positive way. A lot of you may already be aware of 3DContentCentral and GrabCAD, but are you aware of The Foundry Community?

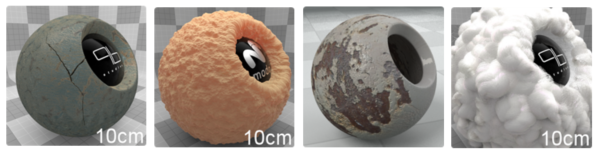
The Foundry community is an asset site. A place where people share materials and appearances. These aren’t just normal off the shelf appearances though. Although there are classic appearances available such as plastics and metals, there are also appearances like Elmo Fur, Dirt, Cracked Paint, rust and a green lava blob just to name a few. These new appearances are something that can take your rendering to the next level. You’ll no longer be limited to the standard appearances in SOLIDWORKS.
SOLIDWORKS Rendering PhotoView360
Step 1.
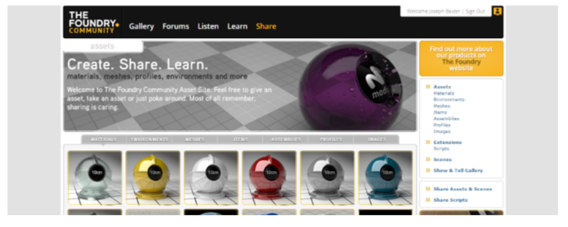
The first thing you’ll need to do once you’ve built a model is sign up to The Foundry Community. This is completely free and once you’ve signed up, you’ll have access to 1000s of different appearances.
SOLIDWORKS Rendering PhotoView360
Step 2.
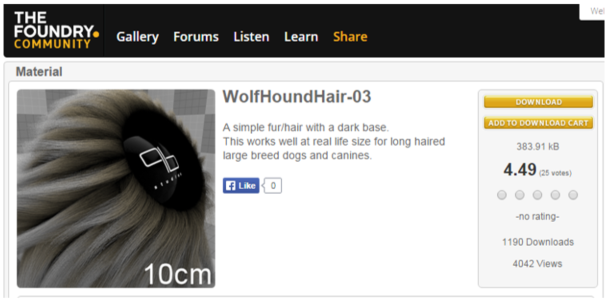
The next thing you’ll want to do is simply browse for the look you’re after. Once you’ve found the one you want, simply accept the terms and conditions and press download.
When you press the download button, the zip file opens in windows explorer.
SOLIDWORKS Rendering PhotoView360
Step 3.
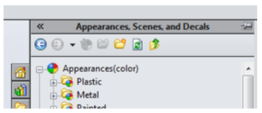
When the zip files opens in windows explorer simply move it out of the way and when in SOLIDWORKS taskpane click on the appearances tab.
There are various ways you can save the new appearance in the appearances folders. But for now we are simply going to create a new folder called ‘Foundry’ in the appearance library. You can name yours whatever you like or whatever you feel will be most suitable.
SOLIDWORKS Rendering PhotoView360
Right click on the appearances folder and click open folder. Next create a new folder called ‘foundry’ and drag the .lxp file from the downloaded zip file into the ‘Foundry’ folder. Refresh the folder and your new appearance will be ready to apply and use like all of the other appearances
Step 4.
Apply the new appearance onto the face/body/part. Notice the appearance appears in the graphics window as 2D. This is because surface finishes only appear when rendering occurs. You can however preview the new appearance using the preview render functionality of  PhotoView360.
SOLIDWORKS Rendering PhotoView360
Here is an example that I carried out to show you the kind of affects that you can achieve by using this new appearance library.
Photoview 360 is included in both SOLIDWORKS Professional and SOLIDWORKS Premium software packages.

Friday, 16 October 2015

We have a new rendering software for SW2016 called SOLIDWORKS Visualize. Photoview 360 is still going but may not be forever.

Who can benefit from SOLIDWORKS Visualize?

SOLIDWORKS Visualize has been created for anyone who needs to create professional photo-quality, images, animations, and other 3D content in the fastest and easiest way possible. SOLIDWORKS Visualize is hardware-agnostic, which means designers, engineers, and content creators who use SOLIDWORKS or other CAD creation tools (such as Rhino®, Autodesk® Alias®, 3ds Max®) for product, architectural, yacht, mechanical, and other designs can produce an enhanced 3D decision making experience in a fast, easy, and fun way.

Bring your designs to life

Now you can create convincing, lifelike movies and images to use for product comparisons, print and web content, design reviews, or even interactive experiences. You can show your product in multiple visual configurations with different scenes, lighting, and artistic filters. SOLIDWORKS Visualize accurately simulates real-world lighting and advanced materials, while scaling rendering performance to meet the highest demands. Easily add movement, create 360-degree spins, or animate cameras, materials, models, or even the sun. Changes are displayed in real time for maximum flexibility and speed.
Because SOLIDWORKS Visualize is connected directly with SOLIDWORKS, you can automatically update your models using the “Live CAD Update” feature for a truly seamless workflow that provides the flexibility you need to work dynamically.
Aerospace Design Architectural Design Interior Design Consumer Product Design Retail Design Consumer Product Design Aerospace Design Consumer Product Design Jewellery Design Consumer Product Design Automotive Design Automotive Design Automotive Design Automotive Design Automotive Design

SOLIDWORKS Visualize Packages

With today’s constantly evolving global marketplace, time-to-market and design innovation matter more than ever. SOLIDWORKS Visualize enables you to validate your product’s market acceptance in record time with ease and flare featuring:
  • Blazing fast performance and results that are easily scalable
  • Quality images indistinguishable from photos
  • Intuitive interface and minimal learning curve
  • Industry-leading GPU (graphics card) support
SOLIDWORKS Visualize is available in two separate packages:

SOLIDWORKS Visualize Standard

You no longer need to compromise your marketing and presentation materials by relying on screen grabs or budget for costly photographs of prototypes to show your latest product. With SOLIDWORKS Visualize, you can quickly and easily create:
  • Lifelike photo-quality images
  • A moodboard of different colours and finishes
  • High-resolution images ready for print and the web
  • Technical illustrations of key features
SOLIDWORKS Visualize Example from Kia Motors
Kia Motors Design

SOLIDWORKS Visualize Professional

With SOLIDWORKS Visualize Professional you can tell a deeper 3D story about your product using your CAD data. SOLIDWORKS Visualize Professional enables users to easily generate photo-quality stills and interactive animations to effectively communicate the most complex design details. Enjoy all the features of SOLIDWORKS Visualize Standard plus these additional features and more:
  • Demonstrate products more effectively with full animation of parts, models, appearances, camera views, and environments
  • Quickly show off the final design with one-click 360-degree spins
  • Present and compare varying design solutions side-by-side with multiple viewports
  • Unleash your creative side with customizable Camera Filters
SOLIDWORKS Visualize Professional also includes key features to help increase productivity. The integrated Render QUEUE allows you to stack up jobs on your machine or a dedicated render farm to automatically complete one after the other, providing remarkable time savings. Network Rendering is also included for maximum scalability and higher speed, increasing productivity immediately to meet even the most demanding schedules.
Get a Quote Now

SOLIDWORKS Visualize Interior Design Example
Interior Design Example

No CAD knowledge required

With its simple, intuitive user interface, SOLIDWORKS Visualize requires virtually no learning curve and lets users produce content quickly. Detailed training materials, in-depth help files, online tutorials, and user forums provide more detailed instructions to help ensure that even non-technical staff can start creating amazing content instantly.

Friday, 10 July 2015


3D ContentCentral now has a new modern look and feel, making it easier for you to browse the website to find CAD models, library features, 2D blocks, and macros. Plus with advanced search capabilities, you can search from a database of hundreds of thousands of CAD models and millions of configurations in just seconds and can filter your search request by Supplier, Content Type, 3D ContentCentral Category, Tags, and Country.


The newly embedded eDrawings viewer lets you preview and evaluate models from hundreds of supplier online CAD catalogs before downloading. Say goodbye to browser plug-ins, this new viewer uses revolutionary WebGL technology that does not require you to install any plug-ins – getting you to the CAD models you need even quicker. This streamlined process allows you to focus more time and effort on product design.

Discover the new 3D ContentCentral today and save time while eliminating errors in your designs. Go to www.3dcontentcentral.com.

Thursday, 21 May 2015


SOLIDWORKS in has many tools in its arsenal and one that I hope every user knows about is DraftSight. DraftSight is used for accessing existing DWG files and creating new DWG files at a fraction of the cost of the alternative CAD product. If you want to learn more about DraftSight please go to https://www.3ds.com/products-services/draftsight-cad-software/

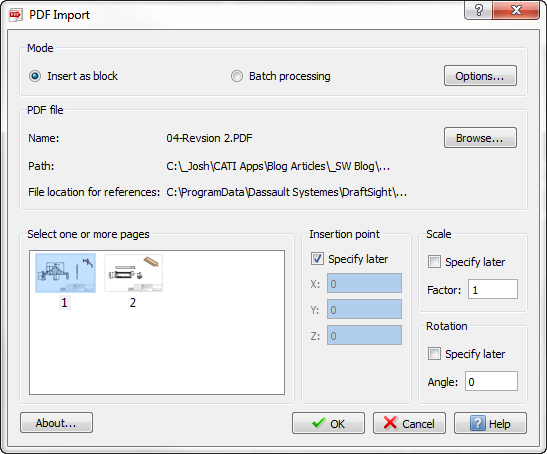
DraftSight, like SOLIDWORKS, has Add-ins available to enhance its capabilities, and one of the newest Add-ins is a PDF Import tool. PDFImport converts and imports PDF files into entities you can modify in DraftSight and save in DWG or DXF. This add-in can also filter the entities created by color and create one layer for each to help you rebuild the layers. You may also use the batch conversion feature to convert many files in once. PDFImport works with the free version of DraftSight, as well as Professional and Enterprise.
PDF_Import-1
Note: Hovering over the images shows a bigger preview of each sheet.
The result imported into the DWG Editor looks as follows
PDF_Import-2
The PDF imports as a block and needs to be exploded before editing.

I have tested the new DraftSight PDFImport tool with several different files and found this took works great for almost anything that I was able to throw at it. The only PDF files that it does not convert into line entities are scanned documents or hand sketches.

Now the real benefit for SOLIDWORKS users is that we can now bring the PDF that we converted to a DWG into SOLIDWORKS.
PDF_Import-3
PDF_Import-4
So with the new tools that have been added to DraftSight not only does this make DraftSight a more powerful tool it also adds to the capabilities of SOLIDWORKS.

Wednesday, 3 September 2014

Have you ever saved an office document locally and also on a network or shared drive so other people can see it? What file is the master then? How do you know who modified the file and when? These questions have presented problems to many of us and lead to lost or incomplete data. I know in my work environment this happens sometimes especially with files stored on a shared drive that several people need to add information into. Someone’s working on it and you don’t know who so you can ask them to close it. The other common problem I often see is where the file is sent around in an email string and you wind up with one version from each person on the thread.
Some companies think that data management is really only useful for CAD data but having better control over your other important files can save time and money. It is estimated that 30% of all data loss is attributed to human error like accidental deletion or damage to hardware. Add this together with time spent searching for files and chasing down the latest version with all necessary information and it results in real costs to an organization. So how can a document management system help manage non-cad data? Here’s some areas to consider:
  • Robust and Integrated Searching
    • Quickly find data across a range of file types using the powerful searching tools right inside Windows Explorer. Perform file content searches on multiple data types (such as CAD files, Microsoft® Word documents, Excel® spreadsheets, Outlook® emails, and image files) and locate documents using a range of search criteria (including name, data, metadata, and workflow status).
EPDM_post1
  • Version and Revision Control
    • Ensure everyone is always working with the “right version” of a file by using revision and version control capabilities. Customize file naming and revision control schemes, maintain document history, and easily manage document versions to avoid the costly manufacturing errors associated with working with the wrong revision.
    • Save time and eliminate manual tasks by taking advantage of automated revision incrementing. Using built-in file plug-ins (to read and write “attribute” information to files) and automated workflow engine, you can increment revision properties when a file reaches a certain workflow state.
  • Centralized Storage and Replication
    • Create and maintain a single data location and vault that can be accessed by users worldwide to store and retrieve files. In addition to preserving a secure backup of product design data, secure file vaulting enables you to eliminate multiple “silos” of information, duplicate files, and unsynchronized revisions. Through vault replication, the convenience of local file access directly from your workstation can be maintained and only use the network to check-in or check-out files, as needed.
  • Integration with Office products
    • Perform vault operations, directly inside the user interface of Microsoft Word, Excel and PowerPoint.  This streamlines working with these documents and opens up the benefits of PDM to other departments outside of engineering.
EPDM_post2
  • Create and manage references to other files
    • Many times one file relates to another like a PDF of a material specification sheet or an Excel based engineering change notice for a CAD model.  A robust PDM system will allow these files to be referenced to each other so when the information of one file is being viewed the relationship to other file can be easily seen.
If these capabilities seem like they would be beneficial to your organization then check out SOLIDWORKS Enterprise PDM (EPDM).  SOLIDWORKS EPDM provides a unique seamless interface with your SOLIDWORKS design workflow as well as your other important documents. SOLIDWORKS EPDM is so well integrated into Windows, SOLIDWORKS and Microsoft Office, it easily becomes part of a user’s work experience and is almost transparent to them.
Click the banner to learn how easy document management can be when you stop worrying and make EPDM part of your design process.

Friday, 8 August 2014

Not that we have this software but thought it might be cool to see what we could do....

Industrial Oven_no switches
As an applications engineer, I’m often asked by customers to give advice on how to test designs using SOLIDWORKS. One of the most recent examples that demonstrates how quick and easy SOLIDWORKS makes this process related to testing how effective a layer of insulating material for an oven was.
The customer designs and manufactures insulation components to be used in industrial ovens and wanted to assess how effective those components were ate shielding the outer surfaces of the oven from the temperatures achieved within.
SOLIDWORKS Simulation Professional gives you the ability to run a Thermal analysis which can be carried out under a large range of conditions and on complex model geometry. But without the lengthy operation of setting up and running an analysis on a complex fully accurate model, here’s a tip on running that all important first test to see if the components and the material properties meet some basic criteria.
1
Firstly, simplify the study by only including what you have to for the moment.
I have done this by only including what I am interested in with regards to heat transferring from the inside of the oven to the outside face. This leaves me with as sandwich of materials representing the internal wall of the oven, the layer of insulating material and then the outside skin of the oven.
By reducing the information that you are including in any simulation study, you will in turn reduce the complexity of the study and therefore the time taken to mesh and run the study. Also, with less geometry to consider, the mesh used to describe your study can be made from smaller elements.
The next step after generating a suitable model for your study is to create the study (or mathematical model) itself.
2
If you haven’t already, make sure that your SOLIDWORKS Simulation add-in is turned on by going to Tools – Add-ins.
SOLIDWORKS Simulation is fully integrated into the user interface enabling you to dynamically move between modelling and simulation without skipping a beat.
3
On the Simulation tab on the command manager simply choose to create a new study and select the type of study that you would like to perform. Depending on the level of Simulation package that you have, only the study types available to you will be shown at this point. For this example, I would like to perform a Thermal study.
4
A study tree is generated in the feature tree / property manager area of the user interface and this allows you to keep track of and modify your study. To speed things up even further, most functionality for controlling and running your study can now be accessed by right-clicking the relevant item in the study tree.
5
All of my materials have been transferred over from my SOLIDWORKS model including the customer material properties that I have added for my insulation material. Also because my basic layers of material are all coincident, they will automatically have a bonded connection defined in the study.
For this particular study, I would like to test the oven when it is running at a temperature of 210 degrees Celsius over the period of an hour and it will probably take a few minutes to heat up. SOLIDWORKS Simulation Professional gives you the option to change the properties of the study to make it transient and to specify both the overall time and the increments to be tested by right clicking the study and choosing properties.
6
I’ve chosen to run the study for 3600 seconds at 60 second increments.
Now what I need to do is apply the variables to my study. By right-clicking the Thermal Loads section of the study tree, I get the options to add Temperature, Convection, Heat Flux & Power, or Radiation values.
7
To start, I would like to define what temperature the components are at the moment. To do this, I’ll create a temperature load as an initial value for all solid bodies of 25 degrees Celsius.
8
I’ll then represent the heat on the inside of the oven by adding a Temperature load to the face that represents the inside of the oven and setting it at 210 degrees Celsius. But as I said, it will take time for the oven to achieve this, so I’ll click the edit button in the Variation with Time section of the properties.
9
Here I can set the time that the temperature source takes to reach particular values. I’ll set this to reach full temperature at 300 seconds (5 minutes).
One last thing before I run the study, I’ll specify that the outer face of the oven is subject to convection into the surrounding atmosphere. This is applied as a Thermal Load onto the outside face.
10
I’ll select the correct face and then add my Convection Coefficient and Bulk Ambient Temperature. A Coefficient of 5-25 W/m^2.K will represent natural convection into the surrounding atmosphere (i.e. no assistance). So a value of 20 should represent a well-ventilated area. You can also switch unit settings if it is easier for you, but 298.15 Kelvin works out at 25 degrees Celsius.
At this point you can specify any mesh size that you would like. But for this study I will simply use the default mesh size that SOLIDWORKS Simulation generates based upon the physical geometry. To save myself a couple of clicks, I can use the default mesh and run the study at the same time by right clicking the top of the study tree and selecting Run.
11
Due to the simplified model geometry and using lightning fast solvers, this study takes no time at all to solve.
12

I can analyse these results using a range of tools including Probe which is accessed through right-clicking the result plot. This enables me to analyse the results on just the face representing the outside of the oven and I can see that the temperature is reasonably low compared to the inside of the oven and I can check this information against my design requirements.
13

Wednesday, 6 August 2014


Have you ever saved an office document locally and also on a network or shared drive so other people can see it? What file is the master then? How do you know who modified the file and when? These questions have presented problems to many of us and lead to lost or incomplete data. I know in my work environment this happens sometimes especially with files stored on a shared drive that several people need to add information into. Someone’s working on it and you don’t know who so you can ask them to close it. The other common problem I often see is where the file is sent around in an email string and you wind up with one version from each person on the thread.
Some companies think that data management is really only useful for CAD data but having better control over your other important files can save time and money. It is estimated that 30% of all data loss is attributed to human error like accidental deletion or damage to hardware. Add this together with time spent searching for files and chasing down the latest version with all necessary information and it results in real costs to an organization. So how can a document management system help manage non-cad data? Here’s some area to consider:
  • Robust and Integrated Searching
    • Quickly find data across a range of file types using the powerful searching tools right inside Windows Explorer. Perform file content searches on multiple data types (such as CAD files, Microsoft® Word documents, Excel® spreadsheets, Outlook® emails, and image files) and locate documents using a range of search criteria (including name, data, metadata, and workflow status).
EPDM_post1
  • Version and Revision Control
    • Ensure everyone is always working with the “right version” of a file by using revision and version control capabilities. Customize file naming and revision control schemes, maintain document history, and easily manage document versions to avoid the costly manufacturing errors associated with working with the wrong revision.
    • Save time and eliminate manual tasks by taking advantage of automated revision incrementing. Using built-in file plug-ins (to read and write “attribute” information to files) and automated workflow engine, you can increment revision properties when a file reaches a certain workflow state.
  • Centralized Storage and Replication
    • Create and maintain a single data location and vault that can be accessed by users worldwide to store and retrieve files. In addition to preserving a secure backup of product design data, secure file vaulting enables you to eliminate multiple “silos” of information, duplicate files, and unsynchronized revisions. Through vault replication, the convenience of local file access directly from your workstation can be maintained and only use the network to check-in or check-out files, as needed.
  • Integration with Office products
    • Perform vault operations, directly inside the user interface of Microsoft Word, Excel and PowerPoint.  This streamlines working with these documents and opens up the benefits of PDM to other departments outside of engineering.
EPDM_post2
  • Create and manage references to other files
    • Many times one file relates to another like a PDF of a material specification sheet or an Excel based engineering change notice for a CAD model.  A robust PDM system will allow these files to be referenced to each other so when the information of one file is being viewed the relationship to other file can be easily seen.
If these capabilities seem like they would be beneficial to your organization then check out SOLIDWORKS Enterprise PDM (EPDM).  SOLIDWORKS EPDM provides a unique seamless interface with your SOLIDWORKS design workflow as well as your other important documents. SOLIDWORKS EPDM is so well integrated into Windows, SOLIDWORKS and Microsoft Office, it easily becomes part of a user’s work experience and is almost transparent to them.

Monday, 24 June 2013

Uninstall SW2011
 
Firstly you need to uninstall SW 2011
 
Make sure all other programs on your computer are closed before you begin this process
 
 
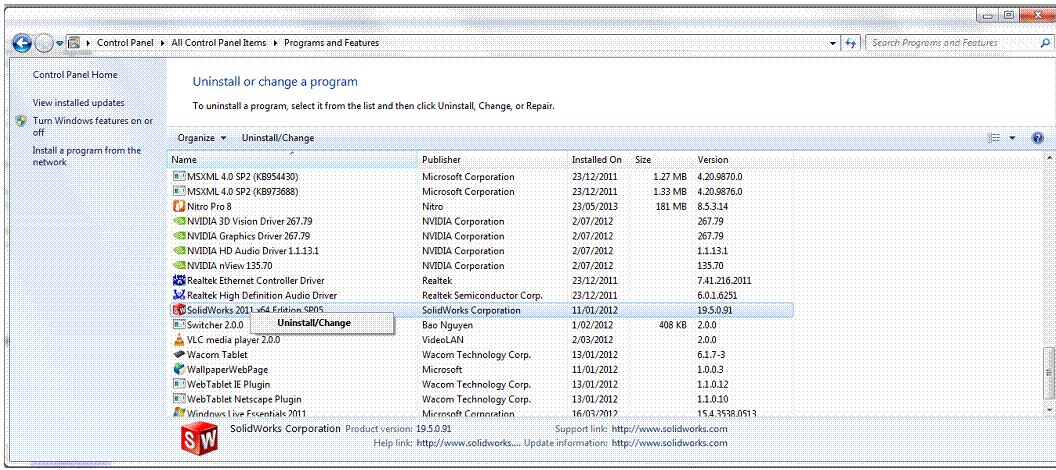
Go to Start Menu/ Control Panel
Click on Programs and Features
Scroll down to Solidworks 2011 x64 Edition SP05/right click/ click uninstall/change to begin the uninstall process
Once this process is finished Euan ( if your in Prod Eng) or Ryan (if your in Design Central) will run through and clean out your registry. This gets rid of all cling on files that hang around from SW2011
 
Please see Euan or Ryan to help you with this
 
Once this has been completed you are free to begin the install of SW2013 SP03
 
Install SW2013
 
copy and paste this link into your windows explorer \\RWARD2\SolidWorks 2013 SP3.0
 
and click on this icon in the folder to begin install


if you have any issues please see Ryan or Euan or Pete
 
 
Ryan Ward (BDes) hons | Design Manager | Future Products Group
ddi: +64 6 843 0869
| www.fpgworld.com
p: +64 6 843 3249 f: +64 6 843 2466
Asia: 0086
21 3351 3390 | Au: 1800 041 649 | NZ: 0800 367 374 | UK: 0808 234 7922